Support & Help - Settings Menu - Work Template Library
Key Points
- Work templates are reusable work orders.
- Individual work orders can be created on demand by copying a work template.
- Recurring work orders can be scheduled on a repeating basis.
- Use filters to help find what you want.
Introduction
Work templates are used for two purposes. The first is to make it easier to add frequently entered work orders. Once these are setup, one can add a new work order by copying a work template.
The second purpose for work templates is to define regularly scheduled work – for example scheduled preventive maintenance. A template can even serve both purposes. For example, something that is normally a scheduled annual inspection can also be assigned on an as needed basis should the need for an inspection arise earlier in the year.
Work Template Library Page
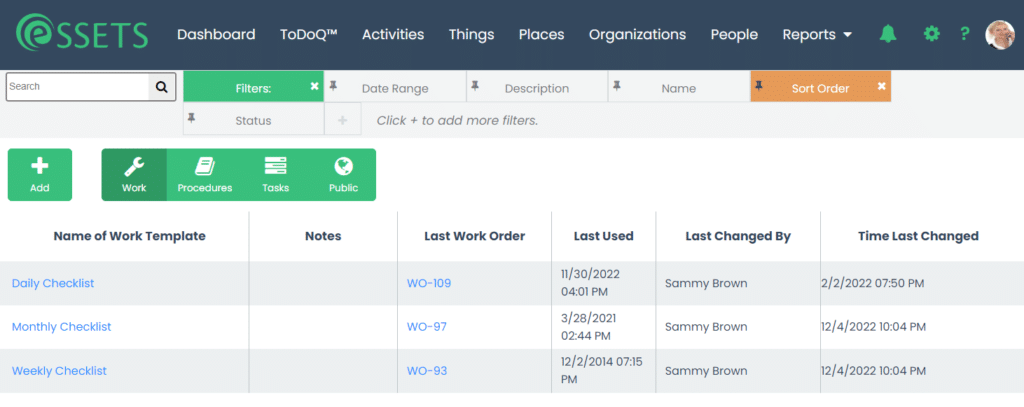
- The Work Template Library page normally shows active work templates alphabetically by name.
- Use the filters under the black menu bar to change what is included in or the order of the list.
- Click any work template name to view more details or make changes.
- Additional functions are shown in the green buttons under the filter bar.
- Read more details about the black menu bar and filters near the top of the page.
Work Template Library Columns

Name of Work Template
The name is a brief description of the purpose of the work template. Make this something that is searchable so that you can find it easily when using the work template when adding a new work order.
Notes
This provides a more detailed description of the work template. The notes are also used when searching for a work template, so you can also use it for frequently searched phrases.
Last Work Order
You can click the work order number to see the most recently added work order that copied the work template. This is especially helpful when clearing out work templates that aren’t being used anymore.
Last Used
This is the date and time the last work order was added – also useful when trying to decide whether a specific work template is still useful.
Last Changed By
This the administrator who most recently made changes to the work template.
Time Last Changed
This is when the administrator last made changes.
Work Template Library Filters
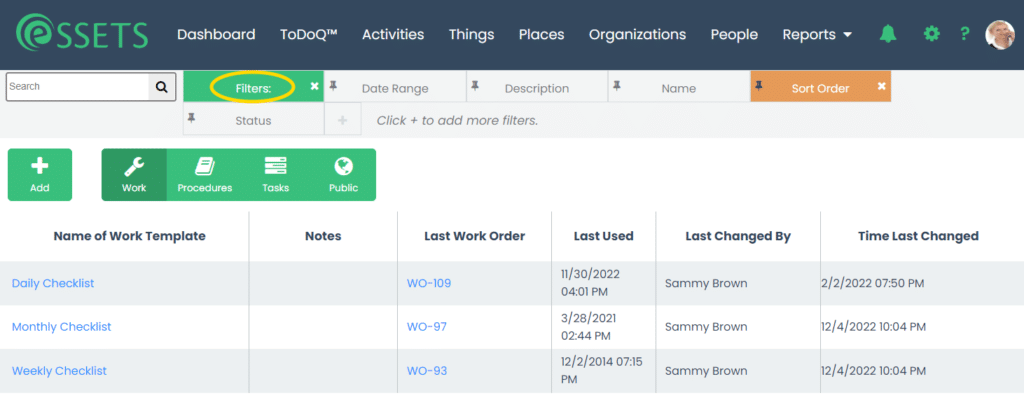
Like most pages, filtering is provided by clicking on the green Filters tab. This shows a list of the filters currently in place.
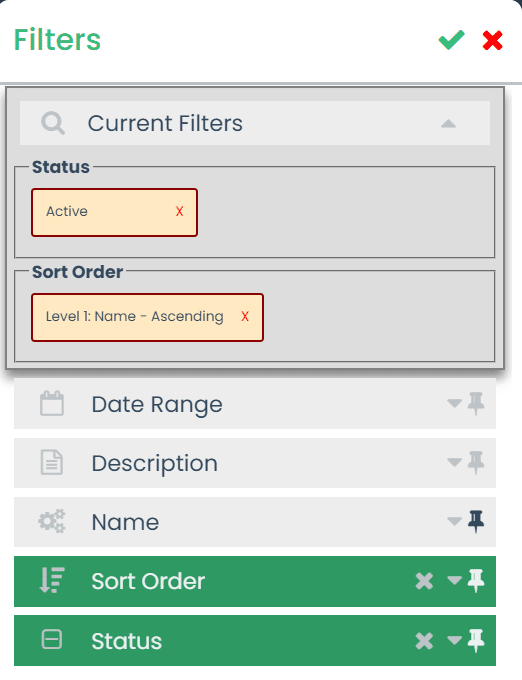
Normally the Work Template Library page displays active work templates, sorted by name. However, you can click on any of the other filters to narrow it further. For example, you can choose an old date range to see what work templates haven’t been used for quite a while.
Once the filters are as you see fit, just click the green checkbox in the upper-right corner to see the filtered page.
For more details about filtering, please see the Filtering support page.
Work Template Library Action Bar

Most pages list an assortment of additional actions that can be taken in a green action bar. Below is a complete list of the available actions. Some are available only for limited sets of users.
Add
Use the Add button to create a new work template. More details follow.
Work
From any of the template pages, click the Work button to get to this page. The button is highlighted in dark green because we are already on the Work Template Library page.
Procedures
Work orders consist of one or more procedures, which are groups of steps or tasks needing to be accomplished before the work is considered to be finished.
Most drivers can relate to the process at an automotive repair shop. You go in with a handful of problems – for example the brakes are squeaking, and the car needs an oil change. Changing the brake pads and changing the oil are two separate procedures to be performed on the car. Each contains several tasks for completing the procedure.
Click the Procedures button to go to the Procedure Template Library page, which is where one can setup reusable procedures.
Tasks
Tasks are smaller chunks of work, several of which may be need to be done in order to finish a procedure.
As an example, suppose you are a dispatcher who is processing a request for moving a set of equipment from one building to another. There isn’t an accurate inventory of the equipment, so in addition to moving some of the equipment, you also want the technician, while already there, to record an inventory of what remains.
One way to handle this is to set up a Procedure that has several steps. The first can be to take inventory of the equipment, and the second is the physical move of some of it to the other building.
Click the Tasks button to go to the Task Template Library page, which is where one can setup reusable tasks.
Public
The Public Work Template Library has reusuable work templates provided by eSSETS and other customers who have chosen to share their work. Feel free to review and use what you find. Read more about the process.
Adding a Work Template

To add a new work template, simply click the Add button.
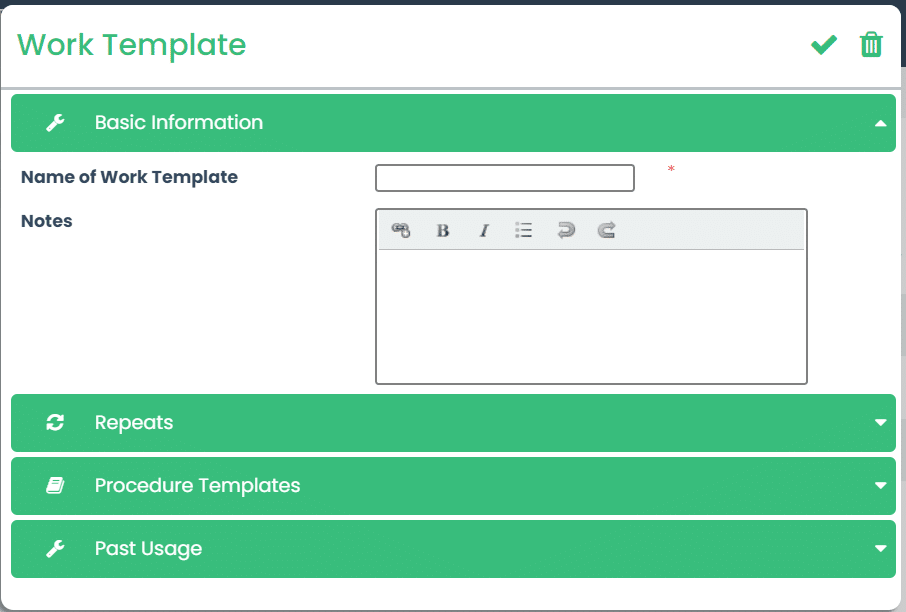
The Work Template dialog has four sections:
- Basic Information, for naming the work template.
- Repeats, used for scheduling recurring work templates for automatically created work orders.
- Procedure Templates, to setup the procedures used in this work template.
- Past Usage, showing the most recent occurrences of this work template being used to create a work order, whether on demand or by the automatic schedule.
When finished with the work template, use the green checkmark in the upper-right corner to save any changes and exit the dialog. You can also delete a work template, perhaps after discovering it isn’t being used, by clicking the nearby trash icon.
Work Template Basic Information
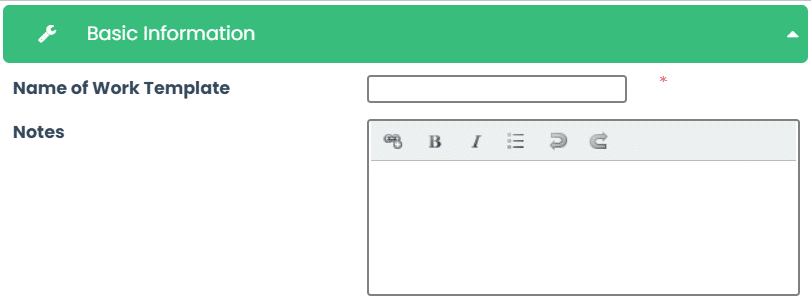
All work templates must have a name. Make it something that is easily searched.
Notes about the work template can also be entered. In addition to describing the work template more fully, you can also add search phrases into the notes. Think of it as a way to add tagging to the work template. For example, if this work template is named Monthly Maintenance, you may also want to add the phrase Preventive Maintenance into the notes so that later, when someone searches for preventive maintenance, the search includes this work template in the results.
Work Template Repeats
Here is where the automatic scheduling of work is done. There is a lot of flexibility with the scheduling options, and with flexibility comes complexity. If, after reading these instructions, you still aren’t sure what to do, don’t hesitate to contact support@essets.com to get the help you need.
Note that if the work template is only going to be used to add on-demand work orders manually, there is no need to setup the scheduling information. On the other hand, a work template that does have the scheduling information can also be used on demand. For example, if the work template is for an annual inspection but we want to do a dry run a month earlier, by all means add a work order manually and pull in the work template.
The setup of the repeating schedule involves identifying:
- When the work needs to be done,
- Who is going to do the work (the assignee), and
- Either where the work will be done (the place) or what needs the work (the thing).

New work templates do not have any repeating schedules at first, so click the + plus sign to get started.
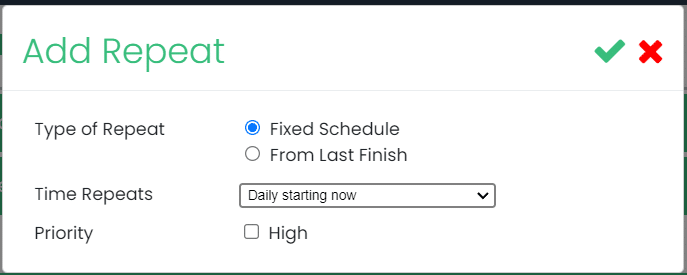
Clicking the plus sign opens another dialog to add the repeating scheduling information. This is used by the automatic scheduler to determine when to add an automatic work order.
Type of Repeat – Let’s use an example to understand the concept for these two choices. Say that the air filter on a car is normally replaced every 3 months, starting on January 15. This means we should change it on January, April, July, and October 15.
What do we do if the air filter is actually replaced on February 1, a little later than planned? Do we plan to make the next replacement be when it was next supposed to be scheduled, on April 15? Or do we want to wait a full 3 months, scheduling the next replacement for May 1?
In the first case, where we want to stay on a rigid schedule, we’d choose Fixed Schedule for the type of repeat. The second case is where we choose From Last Finish, be it’s not the fixed schedule that is most important but rather a full interval between work orders.
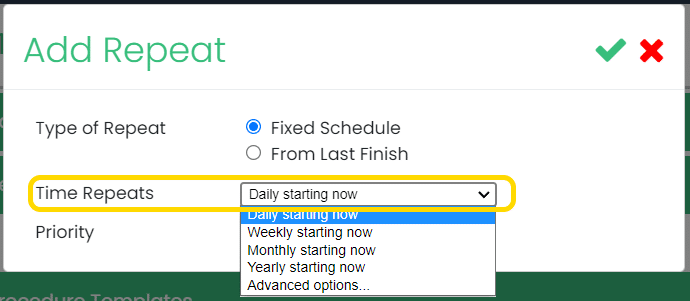
Time Repeats – Here is where we define the length of the time between each automatic scheduling of the work and when to start the scheduling sequence.
Four commonly used choices are available to make the setup really easy. These are daily, weekly, monthly, and yearly intervals, all starting immediately. If you need a different length of time between scheduling or want to start it later, not now, you’ll need to choose the advanced option, described shortly.
Priority – Indicate the automatically scheduled work orders are high-priority. This will put the new work orders at the top of the assignee’s ToDoQ list.
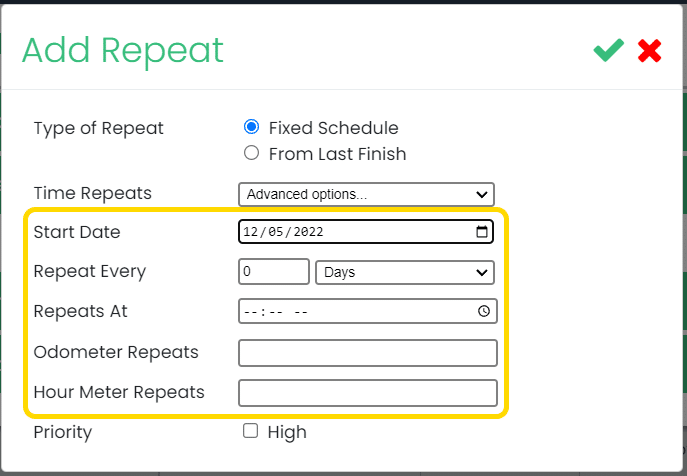
Advanced Repeat Options
When the advanced options choice is selected, the options appear. There are three fields for setting a time interval: Start Date, Repeat Every, and Repeats At. Furthermore, you can set intervals for odometer or hour meter readings.
Start Date – This is the date to start the scheduling. It initially shows today’s date, but you can change it as you see fit.
Repeat Every – This is where you set the scheduling interval. It can be set to a number of days, weeks, months, or years.
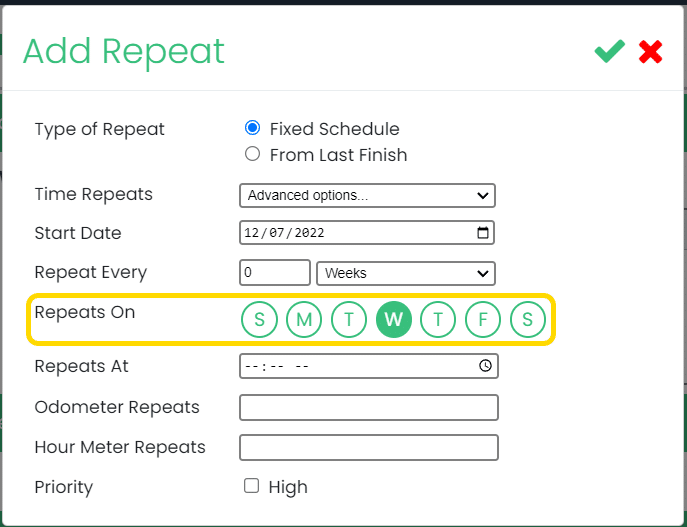
Repeats On – This is a special value that displays only when necessary. It is available only when defining a fixed schedule repeating on a weekly or monthly basis. This is because for a fixed weekly schedule, we need to know which day of the week. We assume it will be the same day of the week as the start date, but you may want to have it scheduled for several days a week – Monday through Friday, for example. Just click on the days you want, which turn to a solid green.
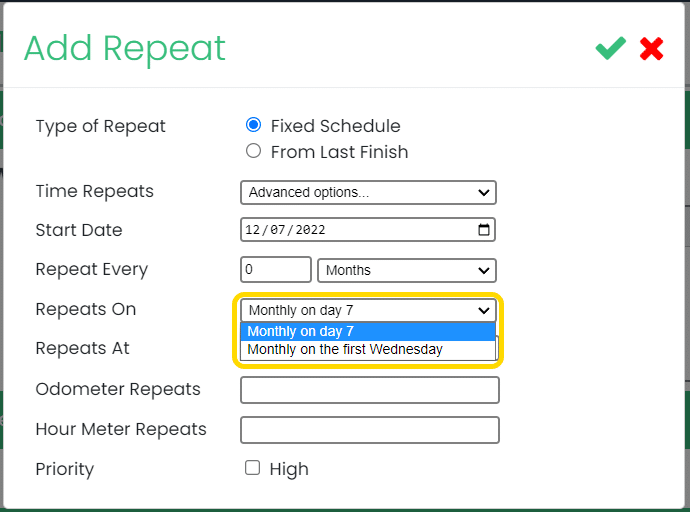
For monthly fixed schedules, we need to know whether this is happening on the same date every month (the 7th, for example) or the same day (the first Wednesday of every month).
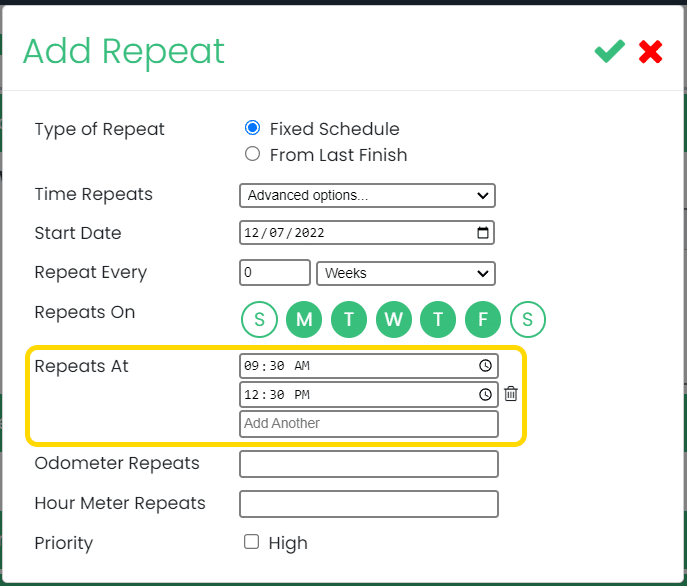
Repeats At – This is where you identify one or more specific times during the day to add a work order automatically. Here is a good case for using a weekly schedule, on Monday – Friday, where we want to check something every 3 hours. You can add as many times as you like by clicking on Add Another. To delete a mistake, hover over it and a trash icon appears on the right. Click it and the time is removed.
You can use Repeats At for any interval – daily, weekly, monthly, or annually. For example, you may want something done at 4 PM the first of every month.
Odometer Repeats – This is used only when the repeating schedule is for a thing that has an odometer. This is the interval that is met between work orders.
For example, if you want something done every 12 months or 12,000 miles, you’d enter Repeat Every 12 months and Odometer Repeats every 12000. The work order is created whenever either of the conditions occurs, whichever happens first.
Note that you need to have the reading entered on a regular basis. This might be a different work template for inspecting the thing and recording the reading every week. When the weekly inspection records the odometer past the trigger point, then the work template for the 12,000 mile preventive maintenance is created.
Hour Meter Repeats – This behaves exactly as it does for odometers, except for those things with hour meters.
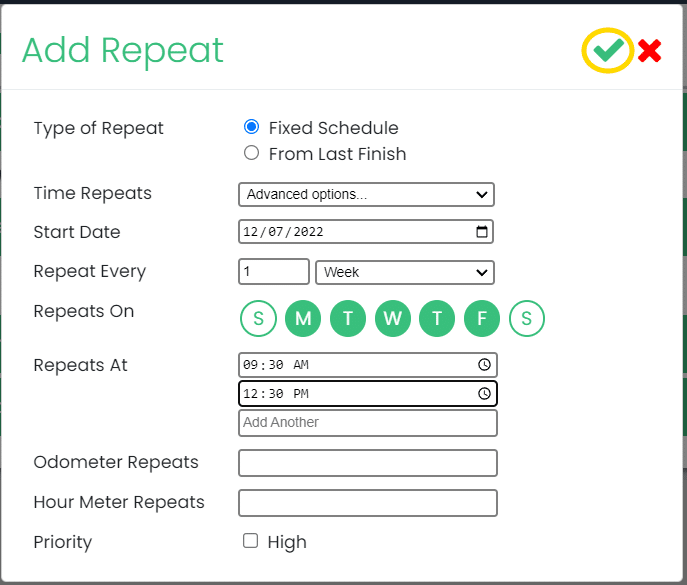
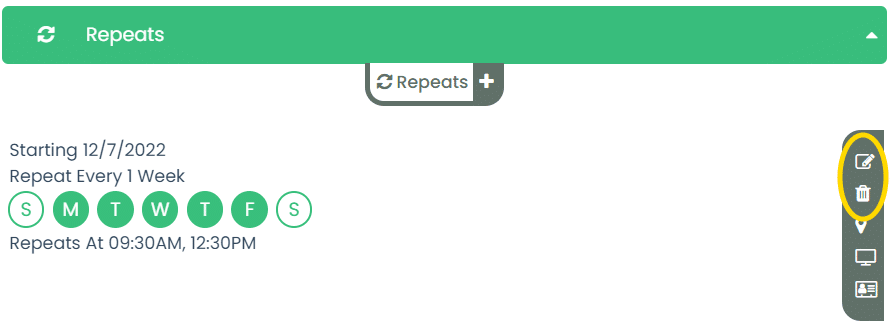
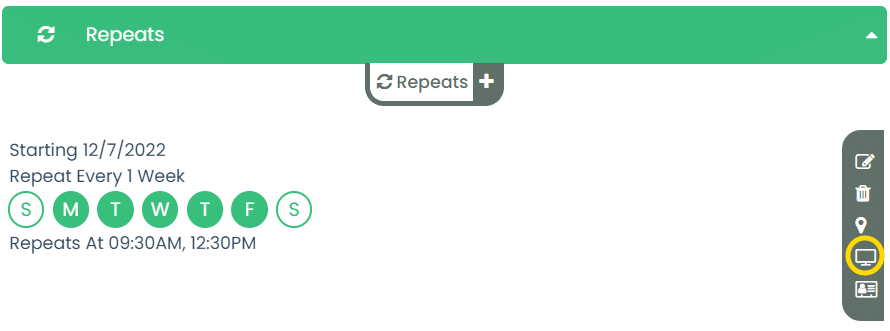
Once saved, you can see the details of the repeating schedule. To the right are icons for editing, or changing, the repeat and a trash icon for deleting the repeat.
Now that the timing of the repeat is finished, we now need to identify who is going to do the work and where or what needs the work.
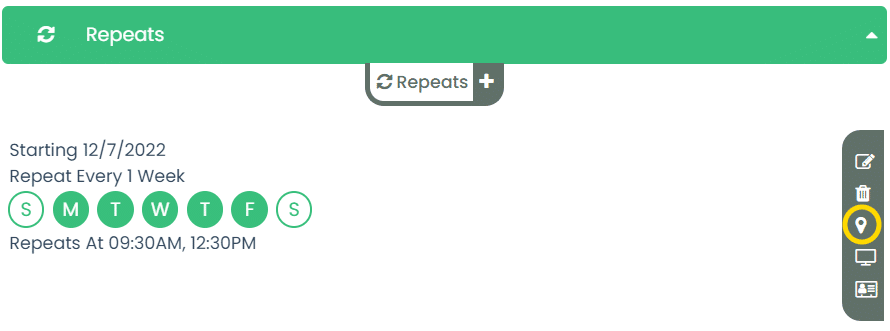
Adding Places to Repeat
When the scheduled work is happening somewhere, as opposed to working on equipment, we are identifying where the work is going to be done. We do that by clicking the map icon so that we can add a list of places.
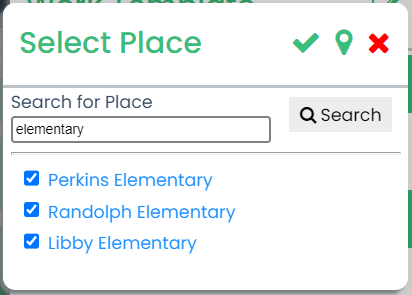
Clicking the map icon opens the standard place chooser. It initially shows all of the top-level places for you business.
You can shorten the list by typing a name into the search box and clicking the Search button. Once listed, mark with a checkmark those places to include in the repeat. Finally, click the green checkmark in the upper-right corner to record your choices.
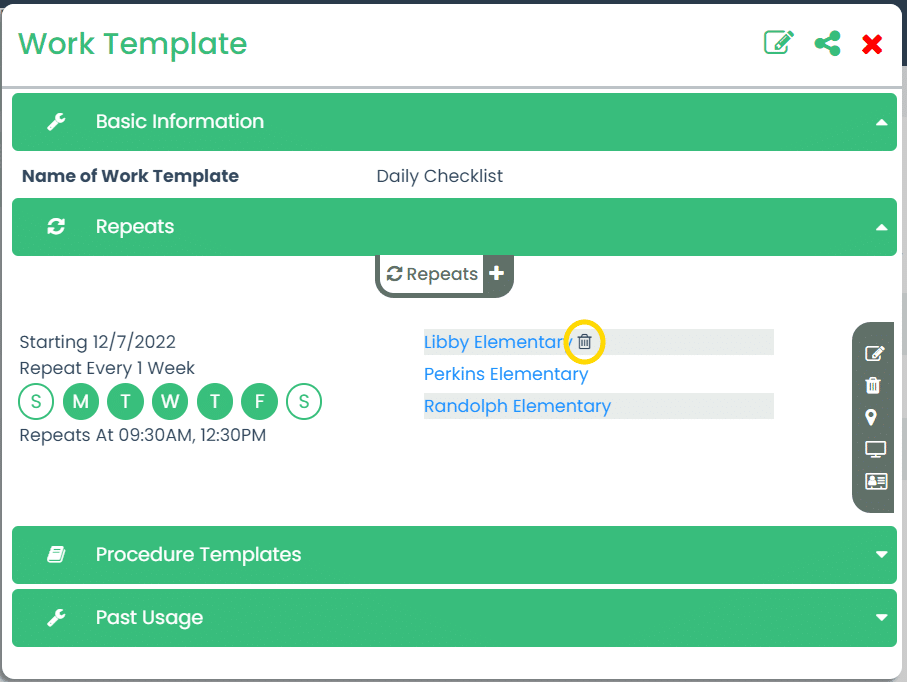
If you later want to remove a place from the list, hover your mouse over the name of the place. A trash icon appears nearby
Adding Things to Repeat
When the scheduled work is for equipment, we are identifying upon what the work is going to be done. We do that by clicking the thing icon, which looks like a computer screen, so that we can add a list of things.
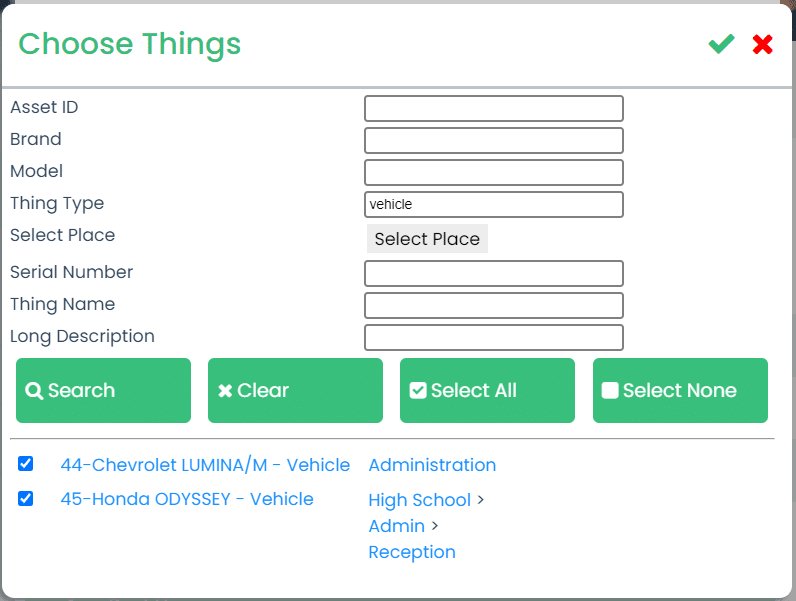
Clicking the thing icon opens the standard thing chooser. It initially shows no things, so you will need to use a filter to get a shortened list. Click the Search button to get the list.
Once listed, mark with a checkmark those things to include in the repeat. Finally, click the green checkmark in the upper-right corner to record your choices.
There are three other green buttons available for helping when there are a lot of things. The green Clear button empties all of the selection fields above the row of buttons, letting you start with a different set of search criteria. The green Select All button adds a checkmark before all of the listed things, whereas the Select None buttons removes the checkmarks. You can experiment with all of these because nothing is recorded until the green checkmark in the upper-right corner is clicked.
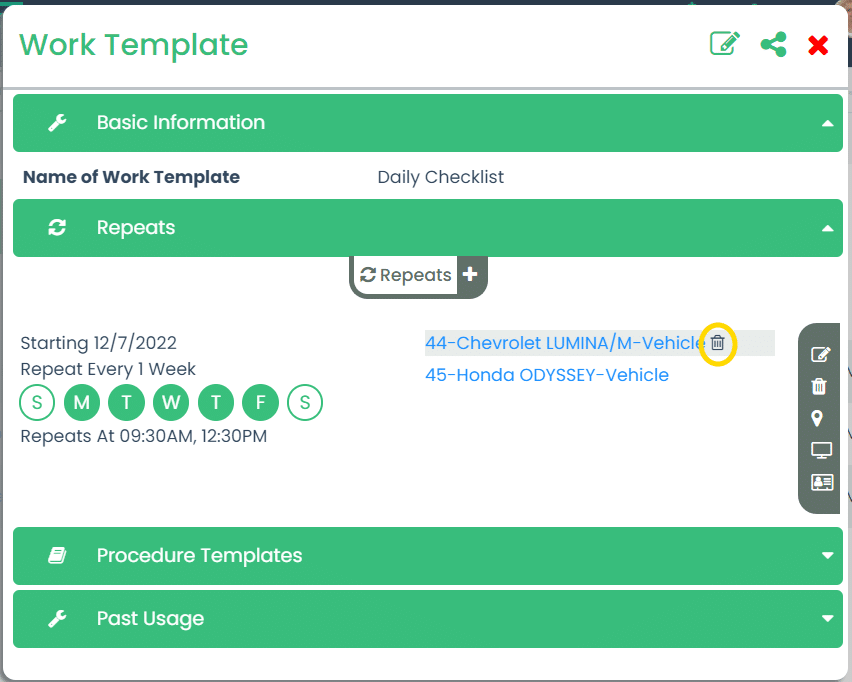
If you later want to remove a thing from the list, hover your mouse over the name of the thing. A trash icon appears nearby.
Adding Assignees to Repeat
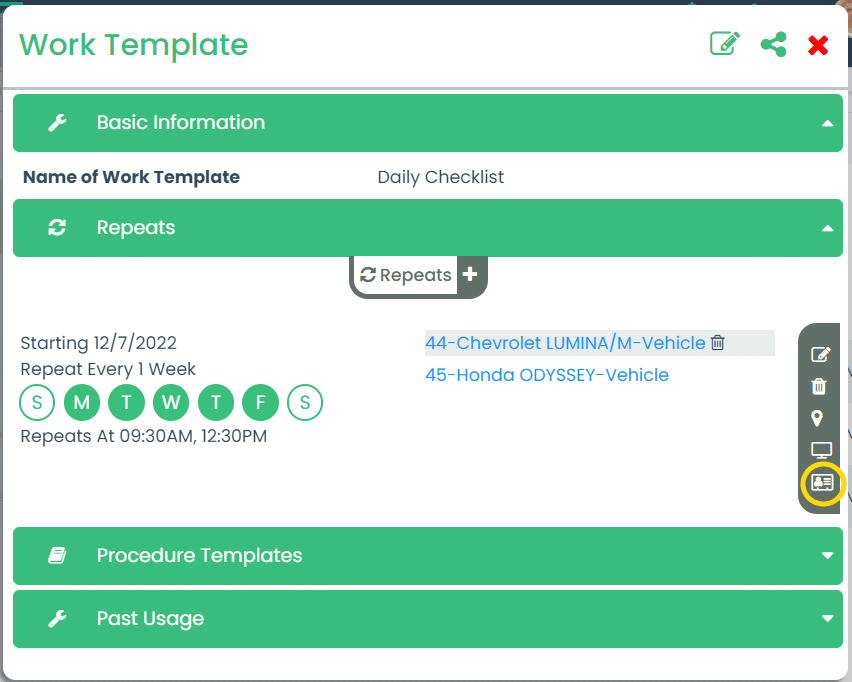
Now that the timing of the repeat is finished, and we have identified where or what needs the work, we now need to identify who is going to do the work. Do this by clicking on the assignment icon.
Note that a repeat doesn’t need to have assignees. The work orders will be created without assignees. Adding the assignees here reduces later work for the dispatcher, but omitting them in the repeat offers greater, last-minute flexibility.
You can also add people who should be notified whenever these scheduled work orders are created. The same icon allows you to designate both assignees and carbon copies (CCs).
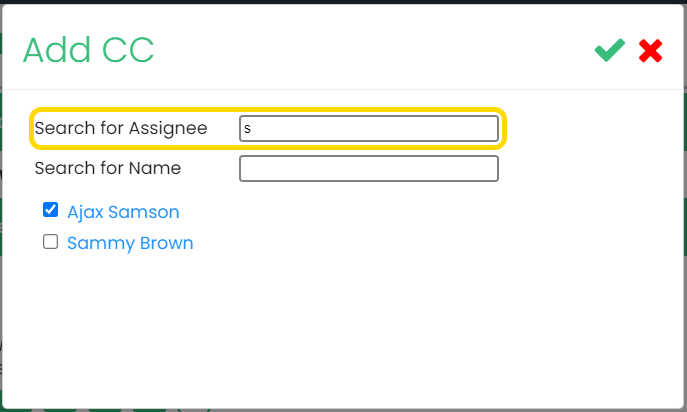
Clicking the assignment icon opens a chooser. It initially lists no people. Start typing a person’s name into Search for Assignee to choose someone who will perform the work, or type into Search for Name to find someone who isn’t working but needs to be notified.
Once listed, mark with a checkmark those people to include in the repeat. Finally, click the green checkmark in the upper-right corner to record your choices.
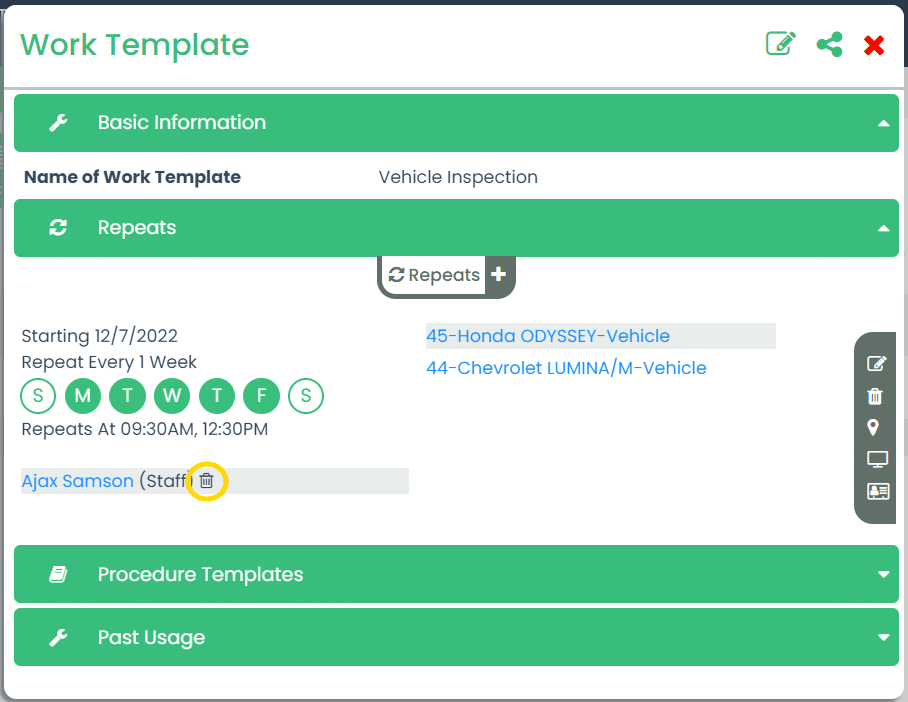
If you later want to remove a person from the list, hover your mouse over the name of the person. A trash icon appears nearby.
Work Template Procedure Templates
Now that we have used repeats to identify when something needs to be done, who is going to do the work and where or what needs the work, we finally get to defining the actual work to be done. Procedure Templates do just that!
Each procedure template is a group of one or more steps, called tasks, that must be completed before the process is done. The procedure template can be as simple as marking a task as finished, or it could be a long list of tasks needed to replace a compressor on an HVAC unit.
There may be several types of work to be accomplished when the procedure template is pulled into a work order. For instance, perhaps once a quarter we need to inspect a building for safety. The inspection checklist is one of the procedure templates added to the work template. While we are inspecting the building, we want to replace fluorescent bulbs while we are already there. The bulb replacement is a second procedure template added to the work template.

New work templates do not have any procedure templates at first, so click the + plus sign to get started. Doing this opens a dialog for choosing a procedure template or adding a new one if you can’t find one that is suitable.
If you need more information on the choosing or setup of procedure templates, please see the Procedure Template Library article.
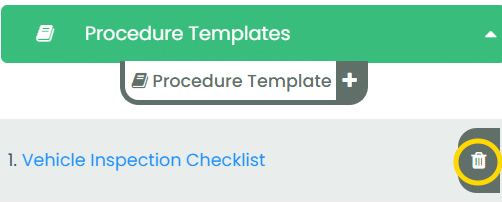
As procedure templates are added to the work template, they are added to the Procedure Templates section of the Work Template.
Note that although Procedure Templates can be linked to a Work Template, they are completely independent of each other. For example, you might create a vehicle inspection checklist that is scheduled monthly. However, that same procedure template can be pulled directly into a manually added work order – for example to do an inspection after a vehicle is sent out for unscheduled bodywork.
This means that if you later want to remove a procedure template from a work template, that only removes the association between the two. The procedure template is still available to be inserted manually into a work order, even after it has been removed from a work template.
To remove a procedure template from the work template, simply click the trash icon.
Work Template Past Usage

The Past Usage section gives a list of work orders that have used this work template, regardless of whether it was automatically scheduled or manually inserted. You can click a work order number to see more details. The status is also displayed.
The main purpose of this section is to help you research whether the work template is still being used or is a candidate for removal in order to keep your list of available work templates clean.
