Quick Navigation

Support & Help - Work Orders

Key Points

  • Work Orders are the bread and butter of the eSSETS application, where any work needing to be done is recorded by those who do the work.
  • Tasks are the building blocks of a Work Order, as simple as marking work as finished or as complex as recording time, materials, photographs, and notes as the task is accomplished.
  • Procedures are groups of related Tasks, as simple as a checkbox for when the requested work is finished or as complex as a long checklist of Tasks for an annual inspection of a location.
  • Complex Work Orders can have several Procedures for longer projects, such as building and equipping a new restaurant.

Introduction

The main purpose of the eSSETS application is facility management, which is managing all of the work necessary to keep your facilities safe and functioning smoothly. This requires a lot of work, and Work Orders is how eSSETS makes sure that work gets done in a timely manner. They track everything from the time the work is requested or scheduled to the time the work is finished. Work Orders are central for assigning the work to the appropriate staff or contractor, who then record their progress as the work is done.

Work Orders are started from a number of sources. The most common is from requests from people outside the facility management department. These requests are reviewed by a dispatcher who sets up the Work Order, assigning the work to an appropriate staff member or contractor.

Work Orders can also be created by a predetermined schedule. This is useful for work such as periodic inspections or preventive maintenance.

Creating a Work Order

Requests for work can come from a variety of sources. The most structured is the SmartQ™ form, where a Requester user utilizes eSSETS to enter a description of the work needing to be done. Non-users (for example, students on a college campus) can use the less structured WebQ™ to request work.

In either of these two cases, the requests appear on the Incoming page. The dispatcher can review what’s on the list. Clicking a request plugs the previously entered information into a new Work Order form.

IncomingQ
Clicking a request on the Incoming page

Requests for work can also come in the form of emails or phone calls. In these cases the dispatcher simply clicks a button to add a new blank Work Order and  then enters any information needed by whoever is going to do the work. For quickly entering a simple request, use the green Quick Job button near the top of the ToDoQ™ page. More complicated requests are routed to a blank Work Order form by clicking the nearby Work Order button.

Add Work Order Buttons
Quick Job and Work Order buttons

Adding a Work Order using Quick Job

For quickly entering a simple request, the dispatcher can use the same SmartQ form used by Requesters. The benefit is that fewer steps are required to have a nearly completed Work Order. After submitting the form, the only remaining step is to assign on the Work Order the staff or contractor who will work to complete the request.

Read about how to complete the SmartQ form if you need more information.

Example of Quick Job Becoming a Work Order

After the request form is submitted by the dispatcher, a new Work Order is created. The information entered on the request form is added to the new Work Order. The next two images illustrate this being done. The first is the completed request form, and the second is the resulting Work Order. Compare the two to see where the information entered in the request gets added to the new Work Order.

Completed SmartQ Form

On the left of the Work Order is a box showing the email notifications. Click the Assigned tab to add assignments to whomever is going to be doing the work, and the Work Order will be added automatically to their ToDoQ.

Creating a Work Order from Scratch

In most cases, starting with a Quick Job is the easiest way to create a new Work Order. For those cases where the work is more involved, requiring several steps, you’ll want to start a Work Order from scratch. Simply click the green Work Order button near the top of the ToDoQ page to get started.

New Work Order

Basics for a New Work Order

The Work Order form is flexible enough that there is much more that can be explained in a paragraph or two. Here are the minimal requirements for a new Work Order. See other topics below to get more details.

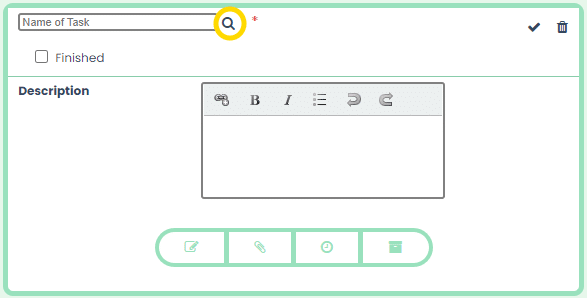
  • Work Order Name – This is the name that is displayed on each person’s ToDoQ. It should briefly describe the work requested. The best practice is to limit the description to some keywords explaining the job as succinctly as possible. These words can be used as search terms using the Description filter on the ToDoQ.
  • Requester – Choose the name of the person who originally wants the work done. You can start typing the name and then choose from the results, or click the magnifying glass to the right for more complex name searches.

    If you can’t find the name because it isn’t in the system yet, you are provided the opportunity to add it.

    Requester Not Found
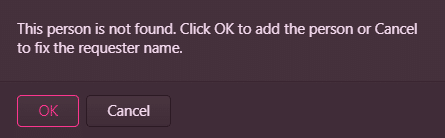
    First check the spelling to make sure it is correct. If it is, click the OK button to get the person added, including contact information such as email and phone if you have it. Otherwise click the Cancel button so that you can fix the misspelling.

    If you decide to add the person, read more information about doing that.

  • Place or Thing IconsPlace or Thing – Indicate what is needing work by choosing a place or thing. To the right are green icons for choosing. Click the map pin icon to choose a place or the computer monitor icon to choose a thing. If you’re not sure which Thing it is, then use Place. This can be changed later when more specific information is known.
  • Procedure Name – Procedures are groups of related tasks, and a single complex Work Order could have several procedures. Using automobile repair as an analogy, a single trip to the mechanic could be for a smog inspection and an oil change. The smog inspection is one of the procedures being done, with its own steps (Tasks), while the oil change is a second procedure that has its separate Tasks. Each procedure needs a name to identify it. For simple Work Orders, dispatchers typically use the previously entered Work Order Name for a single procedure.
  • Work Category – This drop down list has been configured by your administrator to classify the request for searching and reporting.
  • Task Name – Each Procedure can have one or more tasks, or steps, that need to be completed. At a minimum, each task must be named. A detailed description of the work to be done can be added as well.

Other Optional Work Order Information

There are other optional pieces of information available on the work order form.

  •  Requested At – This is when the request was made originally. It is used to calculate the amount of time that has elapsed on this work. Normally you can leave this as is. However, if you got the request from some other means, such as from an email, text message, or voice mail, you may want to adjust this to reflect when the request actually came.
  • Assigned – This is who is going to do the actual work. To add assignments to staff or contractors, click the plus sign + to the right of Select All. Although optional when creating a work order, you’ll eventually want to make an assignment so that somebody knows to do the work. Also make sure each assignee has an email address listed under the name so that they will get notified. You can click on the name to open a dialog for adding the contact information.
  • Task Description – This is the text area where you elaborate important details about the request. Have fun, you’ve got up to 4,096 characters for the explanation.

Work Order Roles

The Work Order Form is quite flexible in that it adjusts its capabilities according to who is viewing it. For example, the original requestor of the work should be able to see who is performing the work, but dispatchers have the added capability of assigning and reassigning the work based upon who is available.

Specifically, the capabilities of a displayed Work Order is determined by the role of the person viewing the Work Order.

  • Requester – The person who originally requested the work, for the most part. can only view the Work Order. They can help clarify the issue by adding notes and uploading images and documents. A requester can also add to the list of people who are notified whenever the status of the Work Order changes.
  • Dispatcher – This is the person who analyzed the work request, created the Work Order, and assigned the work. Dispatchers are permitted to adjust the Work Order in any way they see fit.
  • Administrators – With administrative permissions across the system, administrators are also able to adjust the Work Order as they see fit, even when otherwise not directly related to the Work Order.
  • Staff Assignees – People who are on the staff of the business are able to record almost anything on a Work Order. One of the few things they can’t do is change the time slot the dispatcher requires them to do the work. This is because changing that time slot could have ripple effects with other scheduled work.
  • Contractor Assignees – These are people or companies outside the business who are performing the required work. They are limited to recording and documenting what they did but aren’t able to change what was assigned. Note that because contractors are not designated eSSETS users, they are sent a special link in their emailed work order notifications, giving them access to the work order. Contractors use this rather than logging onto the eSSETS app.

As more details of the functionality of Work Orders are described below, the roles capable of doing that function are noted.

When Not Sure What To Do...

What Now Button

If you open a work order and aren’t sure what to do, you can click the What Now? button shown near the top left of a work order.

Dialog Box Shows What Can Be Done To The Work Order

After clicking What Now, you’ll see a list of things you can do. Clicking a list provides you with instructions on how to do it.

The list varies based upon the role you have with this particular work order. For example, the list may be different if you are the dispatcher of this work order rather than a staff assignee. You can see what role you have under your name, shown at the top. This example shows that Sammy Brown is a staff assignee.

Enter/Select Task Result

When to Use

Work Orders are designed to get work accomplished. To indicate progress, each task needs to be recorded as the work is done.

This may be as simple as clicking a checkbox to indicate work is finished, or it may be recording a reading or observation.

Permitted Roles

  • Dispatcher
  • Administrator
  • Staff Assignee
  • Contractor Assignee
Enter or Select Task Result

Tasks have three methods for recording completed work.

  • A checkbox indicating the work is finished.
  • A place for entering a number, such as a meter reading.
  • A list of choices. Just choose the one most accurately representing the current status.

Enter Task Notes

When to Use

Whenever one wants to provide further clarification, recording a note in a task is the thing to do. This keeps the notes together within the work order, rather than having them scattered among emails, text messages, and chat sessions.

  • Further refinement of what needs to be done.
  • Explanation of why something was done.
  • Description of how the task was accomplished.

Permitted Roles

  • Requester
  • Dispatcher
  • Administrator
  • Staff Assignee
  • Contractor Assignee
No Notes Yet

When a task doesn’t yet have any notes entered, the Notes icon starts with a white background. Click it to open the first note.

Once the note is open, just type in the big white box. Above the box is an array of formatting tools in case you need to highlight something in bold or italics.

When finished, just click the green checkmark in the top-right corner.

Once the note is added, the Notes icon now shows in green rather than white. Green icons indicate a task has whatever that icon represents, in this case Notes.

To the right of the note is an Edit icon. Clicking this opens the note for further editing or deletion. Don’t worry though. eSSETS keeps track of all note revisions so that you can see the original note as well as any changes.

Add Attachments

When to Use

As the saying goes, a picture is worth a thousand words. Document something visually by attaching pictures and videos.

  • Show "before" and "after" photos of the work being performed.
  • Attachments are more than pictures and videos. Almost any file can be attached, including PDF files such as repair manuals.
  • Contractors can use attachments to upload an invoice rather than mailing it.

Permitted Roles

  • Requester
  • Dispatcher
  • Administrator
  • Staff Assignee
  • Contractor Assignee
No Attachments Yet

When a task doesn’t yet have any attachments uploaded, the Attachment icon starts with a white background. Click it to upload the first attachment.

After clicking the icon, a box appears for choosing which files you want to attach to the task.

  • The first available method is to drag and drop files from another window to this box. An example is from Windows File Manager.
  • The second method is to click the Select Files button.
  • The button presents you with a file chooser you can use to find and select the files you want to attach.
  • Devices with cameras may also let you choose to use the camera to take a picture or video.

Once the attachment is uploaded, the Attachments icon now shows in green rather than white. Green icons indicate a task has whatever that icon represents, in this case Attachments.

To the right of the attachment are two icons. The first is an icon for downloading the file in its original size. The second, a trash can, is for removing the attachment from the task.

Enter Task Time

When to Use

In many cases it is helpful to see how long it took to finish a task, for example future planning and scheduling. The eSSETS app allows one to record the duration and even the start and end times an assignee works on a task.

Permitted Roles

  • Dispatcher
  • Administrator
  • Staff Assignee

Enter Time

When a task doesn’t yet have any task time entered, the Time icon starts with a white background. Click it to enter the first time recording.

Recording Time

After clicking the icon, a box appears for entering time. You have two ways to do this.

  • If you have actual start and end times, you can enter those. The Hours Worked are calculated for you.
  • If you don’t have actual times, you can enter the Hours Worked yourself.
  • Click the green checkmark to record the hours worked.

Once the time is recorded, the Time icon now shows in green rather than white. Green icons indicate a task has whatever that icon represents, in this case Time.

To the right of the time entry are two icons. The first is an icon for editing the time so that it can be fixed. The second, a trash can, is for removing the time from the task.

Enter Task Materials Used

When to Use

Whenever one wants to record non-labor costs for reporting purposes, one can enter that information on a task-by-task basis. The costs are recorded either from on-hand inventory or from materials purchased from a vendor for the express purpose of the task at hand.

Permitted Roles

  • Dispatcher
  • Administrator
  • Staff Assignee
  • Contractor Assignee

Enter Task Materials Used

When a task doesn’t yet have any task materials entered, the Materials icon starts with a white background. Click it to enter the first material’s cost.

Choosing the Source of the Materials

Once the dialog box is open, the first thing you’ll indicate is whether the material is coming from on-premise inventory or was just purchased from a vendor. Choose Place if it is from inventory  or Organization if it is a vendor.

For inventory, you’ll need to use the field to the right to choose from where the inventory is being drawn. On the other hand, if the item was just purchased from a vendor, you’ll use the field to choose from the organizations you have in eSSETS.

Vendor Material Source

Notice that when obtaining the materials from a vendor, you’ll be given the opportunity to enter the purchase order and invoice number. These aren’t required though.

All of the information entered in this dialog box is also recorded in Transactions. You’ll be able to see it on a variety of reports such as the Transaction Analysis.

Once everything is entered, click the green checkmark in the top-right corner.

Once the materials are recorded, the Materials icon now shows in green rather than white. Green icons indicate a task has whatever that icon represents, in this case Materials.

To the right of the materials are two icons, Edit and Delete. Click the Edit icon to return to the dialog box in order to make corrections, or click the Delete icon to remove the row completely.

Add a Procedure

When to Use

Work Orders consist of one or more Procedures, which are groups of steps or tasks needing to be accomplished before the work is considered to be finished. One adds a Procedure to a Work Order whenever a series of related, grouped tasks need to be accomplished.

Most drivers can relate to the process at an automotive repair shop. You go in with a handful of problems - for example the brakes are squeaking, and the car needs an oil change. Changing the brake pads and changing the oil are two separate procedures to be performed on the car. Each contains several tasks for completing the procedure.

Every Work Order requires at least one Procedure, each of which requires at least one Task per Procedure.

Permitted Roles

  • Dispatcher
  • Administrator
  • Staff Assignee

Add a Procedure

Newly added Work Orders automatically create the first Procedure and its first Task for you. For simple Work Orders, all that is required is to enter a name for the procedure (Rearrange chairs, for example), indicate the type of work category, and the name of the task. Oftentimes the name of the procedure and task are the same.

You’ll need to save both the Procedure and Task by clicking the checkmark to the far right of the names.

Procedure Added

Once a procedure has been added to the work order, additional procedures can be added by clicking the plus sign to the far right of the procedure name. Doing this adds the new procedure to the end of the list.

Once again you’ll need to enter and save the names of the second procedure and task as well as the work category.

Using a Procedure Template

Using a Procedure Template

Not all work consists of a single thing to do. In our earlier example of changing brake pads, that could be a series of repetitive steps performed each time brake pads are changed. This is a prime opportunity for using a procedure template.

Simply put, a procedure template is a repetitive series of tasks for a single procedure. Rather than entering all of the steps each time the work needs to be done, they can be setup once and then reused over and over.

When you want to use one of these predefined Procedure Templates rather than entering everything yourself, click on the magnifying glass to the right of the name of the procedure.

Select Procedure Templates

Once you see the dialog box for choosing a procedure template, just start typing into the search box. You’ll see a list of possible candidates. Simply choose the one you want and then click the green checkmark. All of the details, including tasks accompanied by attachments such as pictures or instruction manuals, are pulled into the new procedure.

If you can’t find a predefined procedure template, perhaps one hasn’t been created yet. Rather than going back to the procedure and doing it there, just click the plus sign to the right of the search box. This lets you add a new procedure template. You can also define the series of predefined tasks making up the new procedure template. Do it once, and you’ll never have to enter it all again.

Delete Unneeded Tasks

After adding the procedure template, you may find that some of the included tasks don’t apply to this particular work order. Any of them can be deleted by clicking the corresponding Delete icon.

Add a Task

When to Use

Work Orders consist of one or more Procedures, which are groups of steps or tasks needing to be accomplished before the work is considered to be finished. One adds a Task to a Procedure whenever another step is needed.

As an example, suppose you are a dispatcher who is processing a request for moving a set of equipment from one building to another. There isn't an accurate inventory of the equipment, so in addition to moving some of the equipment, you also want the technician, while already there, to record an inventory of what remains.

One way to handle this is to set up a Procedure that has several steps. The first can be to take inventory of the equipment, and the second is the physical move of some of it to the other building.

Permitted Roles

  • Dispatcher
  • Administrator
  • Staff Assignee

Add a Task

In this example, the first task has already been setup. To add a second task, just click the plus sign to the far right of the task name.

New Task Created

The new task is placed at the very end of the procedure. Enter the name of the task. You can also optionally enter:

  • A longer explanation of what action is required.
  • Adding a note by clicking the Note icon, the first of the 4 icons shown at the bottom of the task.
  • Uploading attachments, such as pictures, videos, or documents, by clicking the Attachment icon, the second from the left.

Once you are finished, don’t forget to click the checkmark in the upper-right corner of the task.

Using a Task Template

Using a Task Template

To simplify the addition of commonly added tasks, your organization may have already setup a task template. This is handy, for example, when the task requires some explanation and may even have documents or how-to videos attached. It’s easier to use one of these predefined task templates than it is to start from scratch.

To use a task template, click the magnifying glass icon to the right of the task name.

Select Task Templates

Once you see the dialog box for choosing a task template, just start typing into the search box. You’ll see a list of possible candidates. Simply choose the one you want and then click the green checkmark. All of the details, including attachments such as pictures or instruction manuals, are pulled into the new task.

If you can’t find a predefined task template, perhaps one hasn’t been created yet. Rather than going back to the task and doing it there, just click the plus sign to the right of the search box. This lets you add a new task template. Do it once, and you’ll never have to enter it all again.

Delete a Task

When to Use

Work Orders consist of one or more Procedures, which are groups of steps or tasks needing to be accomplished before the work is considered to be finished. One deletes a Task from a Procedure whenever the work described in that step is no longer needed.

Permitted Roles

  • Dispatcher
  • Administrator
  • Staff Assignee

Delete Unneeded Tasks

In this example, the Daily Checklist procedure has three task to complete. Suppose today it is not necessary to take the water temperature. Just click the Delete icon to the far right of the task name. You’ll be offered the opportunity to confirm the deletion.

All associated notes, attachments, time, and materials are also removed.

Click Start

When to Use

When actual work has begun on a Work Order, clicking Start indicates who is doing the work. Once started, the status of the work order changes from New to In Process. This lets others know progress has started.

The person doing the work, called an Assignee, can click Start for themselves. The dispatcher and other administrators can click Start for others after the fact.

Permitted Roles

  • Dispatcher
  • Administrator
  • Staff Assignee
  • Contractor Assignee
Assignee Clicking Start

Assignee Clicking Start

When an assignee views a work order, the Start icon appears at the top of the work order. Clicking the white flag starts the work order.

Assignee Clicked Start

After the assignee clicks Start, the status of the work order changes to In-Process. The date and time the work was started is shown next to the name of the assignee. Finally, the flag icon changes to a checkered flag. The assignee clicks the checkered flag once the work is finished.

Administrator Clicking Start

Sometimes assignees forget to click the Start icon. Dispatchers and other administrators can do it for them. This is especially helpful when the administrator knows the work is completed and wants to get the work order status updated correspondingly.

Assignees are visible on the Assigned tab. To the right of each assignee are a number of icons. Click the white Start flag to indicate that assignee started the work, or click the checkered Finish flag to indicate the work is completed.

Change Time Entry

When to Use

In many cases it is helpful to see how long it took to finish a task, for example future planning and scheduling. The eSSETS app allows one to change the duration and even the start and end times an assignee worked on a task.

Permitted Roles

  • Dispatcher
  • Administrator
  • Staff Assignee

Change Time Entry

The Time section of each task shows the number of hours per day that an assignee worked on the task.

To the right of the time entry are two icons. The first is an icon for adjusting the time. The second, a trash can, is for removing the time from the task.

Recording Time

After clicking the icon, a box appears for adjusting the time. You have two ways to do this.

  • If you have actual start and end times, you can enter those. The Hours Worked are calculated for you.
  • If you don’t have actual times, you can enter the Hours Worked yourself.
  • Click the green checkmark to record the adjusted hours worked.

Change Materials Entry

When to Use

Whenever one wants to adjust non-labor costs for a task, one can edit or delete any previously entered parts and materials.

Permitted Roles

  • Dispatcher
  • Administrator
  • Staff Assignee

To the right of the materials are two icons, Edit and Delete. Click the Edit icon to return to the dialog box in order to make corrections, or click the Delete icon to remove the row completely.

Change Materials Entry

Make any changes and then click the green checkmark to record them.

If the source of the materials is the wrong type, use the dropdown to change to Place when the materials came from existing inventory or Organization when it was purchased from a vendor.

For inventory, you’ll need to use the field to the right to choose from where the inventory was drawn. On the other hand, if the item was purchased from a vendor, you’ll use the field to choose from the organizations you have in eSSETS.

Change Assignee

When to Use

Work assignments determine who is going to be doing the work. When assignments change over the duration of the work, follow this process to add or remove staff and contractors from the work order.

Permitted Roles

  • Dispatcher
  • Administrator
  • Staff Assignee

Add Assignee

To add an assignment, make sure the Assigned tab is highlighted, clicking it if it isn’t already. Click the plus sign + to add a staff or contractor assignee.

Choose Assignee

Start typing the name of the assignee, whether a staff member or a contractor. All potential matching assignees appear in a list. Mark who you want to assign and then click the green checkmark to finalize the choice.

Delete assignee

Remove a prior assignment by clicking the Delete icon to the right of the assignee’s name.

Add CC

When to Use

Sometimes there are people who are interested in the progress of a work order, even though they aren't directly involved with to work. To notify others when progress is made, follow this process to add people to the list of those to be emailed whenever progress is recorded.

Permitted Roles

  • Dispatcher
  • Requester
  • Administrator
  • Staff Assignee
  • Contractor Assignee

Add CC

To add a CC notification, make sure the Email Notifications tab is highlighted, clicking it if it isn’t already. Click the plus sign + to add a person to the notification list.

Start typing the name of the person. All potential matches appear in a list. Mark who you want to notify and then click the green checkmark to finalize the choice.

Change CC

When to Use

Sometimes there are people who are interested in the progress of a work order, even though they aren't directly involved with to work. To change the list of people to notify when progress is made, follow this process to add to or remove from them from the list.

Permitted Roles

  • Dispatcher
  • Requester
  • Administrator
  • Staff Assignee

Add CC

To add a CC notification, make sure the Email Notifications tab is highlighted, clicking it if it isn’t already. Click the plus sign + to add a person to the notification list.

Start typing the name of the person. All potential matches appear in a list. Mark whom you want to notify and then click the green checkmark to finalize the choice.

Delete CC

Remove a person from the list of notifications by clicking the Delete icon to the right of the person’s name.

A person can be removed temporarily from the list by unchecking the checkmark in front of their name. You can also use the Select All checkbox at the top of the list to include or exclude everyone from the email list.

Override Scheduled Time

When to Use

For businesses who have a lot of staff assignments to shuffle, it may be beneficial to use the available built-in scheduling feature. This gives the dispatcher more information when scheduling the workload for an individual assignee. To add work to an individual's schedule, use the assignee's Schedule icon.

Permitted Roles

  • Dispatcher
  • Administrator

Schedule an Assignee

A list of assignees, both staff and contractors, can be seen on the Assigned tab. Click it if it hasn’t already.

Each assignee has a number of icons available to the right of the assignee’s information. Click the Schedule icon, which looks like a calendar, to work with the assignee’s schedule.

Add Schedule Information

After clicking the icon, a box appears for entering the scheduled time. The bottom of the box also shows any time slots that have already been scheduled. In this example, this is the first time a schedule has been entered for this individual, so it shows that nothing is scheduled.

Enter the beginning and ending dates and times, which calculates the hours, and then click the green Add Schedule button.

Assignee Scheduled

As timeslots are scheduled, they appear at the bottom of the box. This lets you see what is scheduled so that you can find an available timeslot for another work order.

Sometimes you’ll need to adjust the timeslot for a particular work order. This could happen, for example, if more urgent work arises. To change an existing timeslot, just click the link in the Add Schedule column of the list.

You may also decide an assignee should be taken off of a work order in order to free up a time slot. Click the link for the work order in the Description column to open the work order and remove this assignee from the list of assignees.

Finally, each row of the list of scheduled timeslots is color coded. Schedules entirely in the future are coded green. When currently in the middle of a timeslot, it is coded yellow. Timeslots entirely with the past (in other words, didn’t get finished by the scheduled end time) appear in red.

Hold/Release Work Order

When to Use

Sometimes circumstances dictate that work cannot move forward on a work order. For example, a necessary part may become backordered. Putting a work order on hold drops temporarily postponed work from the ToDoQ so that assignees don't have to keep ignoring the work order on their list of assigned work.

Once the postponing condition is resolved, the work order is released from its hold, putting the work back onto assignee's lists.

Permitted Roles

  • Dispatcher
  • Administrator
  • Staff Assignee
  • Contractor Assignee

Holding a Work Order

To put a work order on hold, click the Hold icon located at the right of the work order details. It looks like a pause button on a remote control.

Indicate the reason for the hold by choosing from the dropdown list. You can also tell more about the reason by typing a note.

Click the green checkmark in the upper-right to change the status of the work order to On Hold.

Once the reason for the postponement has resolved, the work order can be added back to the assignee’s queues by clicking the Release icon. It looks like the play button on a remote control.